Blog

CHARMS OF SPRING COLLECTION – Paper Bag – by Carole Wright


FOR THIS PROJECT YOU WILL NEED

  • CHARMS OF SPRING COLLECTION C 97
  • CHARMS OF SPRING COLLECTION C 97 CARD KIT
  • KRAFT PAPER BAG, KRAFT CARD, WHITE DOILY, BLUE CARD, ASSORTED FLOWERS, STAMENS, MINI PEARLS, BROWN INK.

INSTRUCTIONS

  1. Take a sheet of Charming Days C97 002 paper
  2. Cut down to fit paper bag leaving a small border
  3. Tear off the top, ink edges, adhere, leaving a small border
  4. Cut kraft card to fit, distress edges, adhere leaving small border
  5. Cut blue card to fit, distress edges, adhere leaving small border
  6. Cut pretty paper C97 001 to size, distress edges
  7. Add a small white doily
  8. Matt one of the embellishments, adhere to center
  9. Matt  YOU’RE AMAZING sentiment, ink edges, adhere with foam pads
  10. Adhere the butterfly swirl embellishment
  11. Add assorted flowers and stamens.
  12. All done.

12-22-20-IMG_0768

C97 Charms of Spring Collection – Desk Décor – by Vanessa Bester

Desk Décor: Inspirational Frame/ Post it Holder/Pencil Holder

For this project you will need:

Fabscraps Charms of Spring Carders Pack: MC97001A

Fabscraps Charms of Spring Collection paper range: C97003/005/006

Fabscraps Chipboard Pieces: DC97005/008

Fabscraps Stickers ST97001/002

1 sheet of Lagoon Blue Cardstock

Chipboard

A Post it Note size 3” square

A small glass jar or vase

Super strong glue

Cuttlebug or Electronic Cutting Machine

Ranger Silver Acrylic Paint Dabber

Ranger Perfect Pearl Mist to spray on any desired paper embellishments to add sparkle as desired

Assortment of mini paper roses-metallic silver works well in between some colour

A small scalloped Border Punch

A Tear Ruler

A Stipple Brush

General Instructions:

  1. Cut the Chipboard Pieces DC97008/008 out of their frame and use the silver dabber to colour the die-cuts. Set aside to dry.
  2. Using a stipple brush. Dab the top of the mini roses that aren’t silver with the silver acrylic paint. Set aside to dry.
  3. Cuttlebug or electronic die-cutting machine:
  4. Cut a 2” Scalloped Flower and 1 ¼” butterfly from the C97003 (lavender print side) sheet
  5. Cut a 1.5” Scalloped Circle and two 1 ¼” butterflies and a 3” Filigree Butterfly from one of the pink floral 6” X 6” sheets from the Carders Pack
  6. Cut a 2” butterfly from 1 of the darker teal blue 6” X 6” sheets from the Carders Pack

C97 Desk Decor Trio

Inspirational Standing Frame

  1. Cut 2 pieces of chipboard 6 ¼” X 7 ½”. Leave one pieces solid for the back of the frame and cut a window in the other piece so that it is a frame with a 1 ½” border all the way around for the front.
  2. Cut a mat of 8 ¼” X 9 ½” from C97005 and cover the one side of the solid back piece of the chipboard folding the paper over the edges.
  3. Cut a mat of 8 ¼’ X 9 ½” from C97006 and cover the chipboard frame.
  4. Tear and distress the piece of C97005 that remains, adding a torn distressed border from one of the pink floral 6” X 6” sheets from the Carders Pack and then a flat sheet of the darker teal 6” X 6” sheet also from the Carders pack and layer and use to close the back of the frame as per pic.
  5. Adhere the frame and the covered solid chipboard together so that the pretty paper sides are revealed on the front and back.
  6. Make a flapped stand out of cardboard by tracing a flap off an old picture frame and cover or paint and adhere to the back of the frame with superglue.
  7. Finish the frame by adding the silver coloured chipboard, stickers and embellishments as per pic or as you desire.

C97 Desk Decor Inspirational Frame

Post-it Note Holder

  1. Cut a piece of Lagoon Blue Cardstock 3 ¼” X 8 1/8” and score along the long side at 3 7/8” and 4 ¼” and 6 2/8”.
  2. Cut 2 pieces of pieces of Lagoon Blue Cardstock 3 ¼” X 4 2/8” and border punch one short side on each piece.
  3. Fold cover as per pic on the left and adhere one of the border punched mats on the inside and the other on the front folded section of the cover as you would in an easel card.  See pic on right. You will notice that the punched border edge overlaps the edge of the holder,  that is correct.


  1. Cover the inside with patterned paper of choice and adhere post-it note toward the front of the inside cover.
  2. Cover the outside with patterned paper of choice and add Die-cut from Carders Kit. Add Stickers and embellishments as per pic or as you desire.

C97 Desk Decor Post it Note Holder


Pen Holder

  1. Using the same border punch as the post-it note, border punch along the 12” edge on the floral side of C97003.
  2. Cut the height of the border punched strip to match your glass vessel and border punch the parallel 12” side of your paper. Adhere around the glass vessel and decorate with stickers as per pic or as you desire.

C97 Desk Decor Post it Note Holder and Pencil Holder

CHARMS OF SPRING COLLECTION – Layout – by Tersia Roux


For this Project You Will Need:


  • FabScraps Charms of Spring Collection Paper: C97 006, 008, 005, 004 and MC97 001A Card Kit
  • FabScraps Stencil: C94 DS067
  • FabScraps Chipboard Pieces: DC97 005 and DC 94 008
  • FabScraps Stickers: ST97 001 & ST94 002
  • Black, White and Grey Cardstock
  • Tab and Butterfly Punches
  • Gesso
  • Tim Holtz Distress Ink: Bundled Sage and Evergreen Bough
  • Tim Holtz Tattered Flower Die with Vagabond
  • Spray Mist: Misty Maroon
  • Embellishments: Pearls, Bling, Angle Hair, Flowers, Script Stamp, Watch Image and Flowers


Instructions:


Distress all the paper pieces and embellishments with Gesso

Distress with Ink:  Bundled Sage for shadows and darker on edges with Evergreen Bough

Glue Pieces paper C97 004 in left Corner and Bottom Right

Glue from left to right onto 2 sheets Grey Cardstock  2 sheets Cardstock a piece 22×30 C97 006, 10×30 C97 008 in the middle and on far right 13×30 C97 005

Dampen C97 006 and C97 005 lightly with water and fold paper in top left and right corners and also the bottom right corner as on picture and embellish with Flowers and Angle Hair

Stamp with randomly with Stencil


Photo and Layering

Matt 3 same size photos as per picture onto black Cardstock

Mark the placement of photos and create a shadow around photo spaces

Attach one photo on left 12×12 and the other two on right 12×12 Grey Cardstock


Title and Embellishments

Apply Gesso Paste to title piece DC97 005

Attach title next to the left photo

Do the same with the two corner pieces above photos and attach as on picture

Embellish 3 little butterflies and attach onto folds, one onto each fold

Matt the “One fine Day” and Camera Stickers onto white cardstock

Use Distress Inks for chipboard flowers and attach them above camera sticker

Punch 2 Tabs and attach on per picture

Embellish with flowers, seed beads, bling, chipboard pieces, and angle hair

With small paintbrush, create a few splatters onto background with Misty Maroon spray Mist.

All done!

 20170501_233637

CHARMS OF SPRING COLLECTION – Double Page Layout – by Tersia Roux –


For This Project You Will Need:


  • FabScraps Die-Cut Embellishments  MC97 001A
  • FabScraps Chipboard Piece  DC97 003
  • FabScraps Sticker Sheet ST97 001
  • FabScraps Stencils DS 073 & DS 074
  • Gesso Paste
  • 3D Clear Gloss
  • Adirondack Acrylic Paint Dabber – Shell Pink & Juniper
  • Ranger Perfect Pearls Mist – Turquoise
  • Adirondack Color Wash – Stream
  • Pigment Ink – Jet Black
  • Mesh, Embellishments, Seed Beads, Clock Stamp, Baby Wipe, Alphabet Stickers, Glue


Instructions:

  1. Prepare Journal Page with a thick layer of Gesso Paste and leave to dry
  2. Apply Juniper and Shell Pink Acrylic Paint randomly and leave to dry
  3. Apply Stencils  DS 073 & DS 074 with Ink onto left Corner and right bottom of page
  4. Leave to dry
  5. Adhere mesh with glue and Gesso
  6. Mist with Turquoise and Stream Spray Mists and leave to dry
  7. Apply 3D Clear Gloss to raindrops and leave to dry completely
  8. Adhere Chipboard Title and Pieces DC97 003, Stickers from Sticker Sheet ST97001 and Embellishments with the glossy accents
  1. Dab with Baby Wipe until you are happy with result
  2. Ink the Edges of page with Jet Black Ink
  3. All Done!

2017-04-19-14-21-09

CHARMS OF SPRING – TAG – by Michelle Frisby


For This Project You Will Need


  • FabScraps MC97 001A – Charms of Spring card pack collection
  • Metal doily die, tag die and a cutting machine
  • Foliage metal die
  • Metal leaf and metal flower
  • Gilding wax – frosted aqua
  • White cardstock
  • Seam binding
  • Sentiment
  • Bloom
  • Muslin
  • Hole punch
  • Gesso


Instructions for your tag

  1. Using a scallop tag die as the base of your tag cut out one tag using MC97 001A papers and cut out a white cardstock shape.
  2. Adhere a piece of corrugated cardboard [packaging box] for height.
  3. Add a layer of cheesecloth.
  4. Gesso your two pieces of metal embellishments and allow to dry thoroughly.
  5. Then finger paint the gilding wax on the top of your metal embellishments, allow to dry.
  6. Cut a piece of foliage using the same patterned paper as the tag base.
  7. Now layer your metal leaf embellishment and on top of that your patterned paper foliage.
  8. Adhere your floral metal embellishment and the adhered your bloom into the top of your metal embellishment.
  9. Add your sentiment on top of some of the foliage.
  10. Punch a hole in the top of the tag and thread through seam binding.

Happy creating.


C97 collection - Michelle Frisby - tag - memories1

CHARMS OF SPRING COLLECTION – Layout – by Helen Hunter


For This Project You Will Need:

  • FabScraps Charms of Spring Collection paper range C97 008 x 2 sheets
  • FabScraps Charms of Spring Collection paper range C97 005 x 1 sheet
  • FabScraps Chipboard Pieces DC97 005
  • FabScraps Chipboard Pieces DC97 006
  • FabScraps Chipboard Pieces DC97 007
  • FabScraps Chipboard Pieces DC97 008
  • FabScraps Stencil DS 073 + 074
  • FabScraps Die-Cut embellishments MC97 001A
  • Dark Lilac Cardstock
  • Frosted white, Rose Pink, Thistle Tsukineko All Purpose Ink
  • Glossy Accents
  • Tim Holtz Distress Oxide various matching colours
  • Tim Holtz Distress Inks various matching colours
  • Crystal Stickles, turquoise fine glitter
  • Contour Paste
  • Butterfly Punch


Instructions:

  1. Ink chipboard piece DC97 005, 006, 007, 008 (butterflies only) with frosted white all-purpose ink. Blend Rose Pink and Thistle to create blended colour words with darker colour at the bottom of the words. Add glossy accent and leave to dry
  2. Using stencil DS 073 ink with various Distress Oxide Inks the bird on a twig image onto the left hand side of paper C97 008 using at least 3 colours in each part of the open area of the stencil, repeat on right hand side paper by flipping the stencil over and stencilling a mirror image onto the second sheet of C97 008.
  3. Using stencil DS 074 and contour paste lightly stencil the contour past over the distress oxide bird on a twig and leaves as well as in random places over both pages, allow to dry thoroughly.
  4. Using Stencil DS 074 and Distress Ink Peacock Feathers, use a blending dauber, overlay raindrops randomly over the paper, using different strengths of the ink by blending more ink in places
  5. The two paper sheets C97 008 are the base of your double page layout
  6. Fussy cut as many as you can flowers, birds and leaves from paper C97 005 and ink with distress inks to match layout. Using a moulding tool and foam rubber mat, roll the moulding tool on the back side of the fussy cut items to give them a 3D effect.
  7. From left over pieces of paper C97 005 punch butterflies and distress ink them in colours to match layout. Using a moulding tool and foam rubber mat, roll the moulding tool on the back side of the butterflies to lift the wings and give them a 3D effect.
  8. Use die-cut embellishments from MC97 001A, distress ink the edges of the birds, butterflies with twirls as well as the saying choose happiness
  9. Mount Jumbo Photo’s 10cm x 15cm (some photos can be trimmed to narrower width) on dark lilac cardstock. Position the mounted photo’s 2.5cm up from the bottom of the paper used as a base for layout (no. 5) , placing the mounted photo’s across the layout centre outwards
  10. Adhere the chipboard piece DC97 006 to left hand bottom edge of layout, piece DC97 007 to right hand side of the layout above the saying choose happiness
  11. Create a layered bottom edge with fussy cut flowers, leaves, birds along the bottom of the photographs on the layout, using a glue gun to lift edges of the fussy cutting, creating depth to flower and bird border
  12. Distress Ink in a colour of your choice carefully below the flower and bird border to create a shadow
  13. Assemble the butterflies from chipboard DC97 008, punched butterflies and die-cut paper piece butterflies coming from the centre of the flower and bird bottom edge up the centre of the double page spread. Use foam dots to lift the wings and normal craft glue to adhere the bodies, giving the butterflies’ wings dimension. Add crystal stickles to the wings of the butterflies and bright turquoise glitter down the bodies.
  14. Glue down the chipboard saying DC97 005 on the left hand page of the double page spread between the stencilled bird on a twig and leaves and the butterflies coming up the centre of the layout
  15. Glossy accent the distress oxide stencilled bird on the twig on both base pages, allow to dry thoroughly
  16. Run thin lines of glossy accent on the flower and bird border highlighting leaf veins, flower petals, bird’s eyes and flower centres, do not completely cover the border with glossy accent.
  17. All Done!

charms of spring DPS

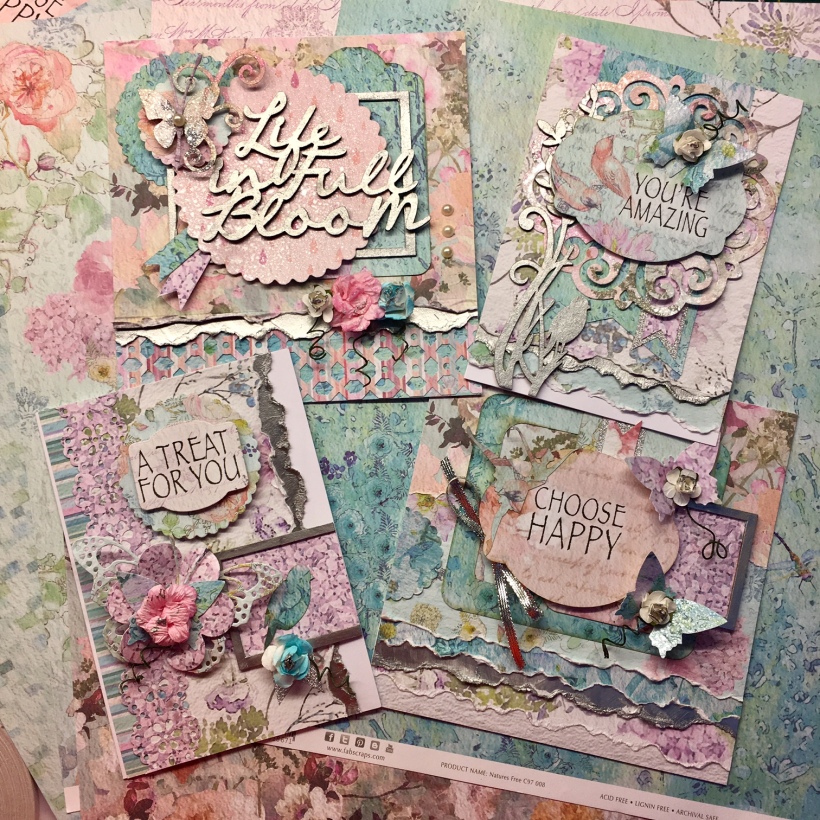
CHARMS OF SPRING COLLECTION – Shabby Chic Cards – by Vanessa Bester

C97 Card Collection

For this project you will need:

Fabscraps Charms of Spring Carders Pack: MC97001A

Fabscraps Charms of Spring Collection paper range: C97001/002/003/007

Fabscraps Chipboard Pieces: DC97004/006

Cuttlebug or Electronic Cutting Machine

Ranger Silver Acrylic Paint Dabber

Ranger Perfect Pearl Mist

Assortment of mini paper roses

5mm wide Silver Ribbon

1.5cm Silver Washitape or Paper Ribbon

3mm pearls

Assortment of Border Punches

A Tear Ruler

A Stipple Brush

General Instructions:

  1. Carefully cut the Chipboard Pieces DC97004/006 out of their frame without damaging the frames.
  2. Use the silver dabber to colour the frames and chipboard die-cuts and set aside to dry.
  3. Using the back grey side of one of the Lavender 6” X 6” papers from the Carders pack, tear it into 4 border strips, distress the torn edges by rolling back and fully colour the torn strips with the silver acrylic paint (I used my fingers here for a more controlled effect). Set aside to dry.
  4. Using a stipple brush. Dab the top of the mini roses with the silver acrylic paint. Set aside to dry.
  5. Punch a wide lattice styled border with a punch of your choice from the C97002 ( striped side) sheet for the “Life in Full Bloom” Card.
  6. Punch a 2-sided scalloped border from the C97003 (lavender print side) sheet for the “A treat for You” Card.
  7. Cuttlebug or electronic die-cutting machine:
  8. Cut a 3.5” Scalloped Circle from the C97001 (raindrops side) sheet
  9. Cut a 4” Doily from the C97001 (floral side) sheet
  10. Cut a 1.5’ and a 2 ¼” Scalloped Circle and a 3” Filigree Butterfly from one of the lighter 6” X 6’ teal sheets from the Carders Pack
  11. Cut a 2 ¼” and a 1 ¼” Scalloped Circle and 3 X 1 ¼” butterflies from 1 of the darker teal blue 6” X 6” sheets from the Carders Pack
  12. Cut a 1 ¼” Butterfly and a 2” Scalloped Flower from the C97003 (lavender print side) sheet


Card no: 1(Square) “Life in Full Bloom”

  1. Trim the darker teal blue 6” X 6” sheet of paper to fit the full size of the front of the card and adhere.
  2. Adhere the punched lattice border to the bottom of the card over the teal paper.
  3. Adhere one of the torn silver border strips across the top of the punched border.
  4. Horizontally tear one of the pink floral 6” X 6” sheets from the Carders Pack and adhere over torn silver border. Cut off overlap at the top of the card.
  5. Layer and embellish as per pic and add two small flags ¾” wide X 2’ long under the bottom left side of the 3.5” scalloped Circle. Ensure to 3D  butterfly, 1.5” and 3.5” scalloped circle.
  6. Add Flowers and pearls.

 C97 Life in Full Bloom Card


Card no: 2(Portrait) “You’re Amazing”

  1. Trim one of the lavender 6” X 6” sheets from the Carders Pack to the width of the card. Tear along the bottom.
  2. Add a torn silver border strip peeping from underneath and in turn another border strip from the lighter teal sheets in the Carders Pack. Adhere to card with a small white border at the bottom and trim off overlap at the top of the card.
  3. Cut a flag from the darker teal sheet in Carders Pack that is 2.5” wide X approx. 4 ¾” long and adhere in the centre of the card flush up against the top of the card.
  4. Layer and embellish as per pic. 3D the greeting die-cut and add silver washitape and lavender paper flag as per pic.

C97 You're Amazing Card

Card no: 3(Square) “Choose Happy”

  1. From the pink floral 6” X 6” sheets in your Carders Pack, cut a piece that is 3/4” high by the width of the card and adhere to the bottom of the card so that the grey printed side is showing.
  2. Using the balance of the pink floral 6” sheet, tear a small piece off the bottom of the sheet and then layer and distress as per pic with a strip of darker teal/silver/lavender.
  3. Adhere to card so that a small amount of grey printed paper shows at the bottom of the card and trim off any overlap at the top of the card.
  4. Adhere one of the darker teal frames from the Carders pack in the centre of your card and a lighter teal tag from the Carders Pack as per pic.
  5. Cut 2” off the long side of the silver frame and set aside. Use what is left and matt the lavender side of DC97003 underneath the frame.  Adhere to card approx. 1 ¾” from the top of the card and 1/4’ from the opening edge of the card.
  6. Embellish card as per pic and 3D greeting die-cut.

C97 Choose Happy Card

Card no: 4(Portrait) “A Treat for You”

  1. Cut a piece of C97007 on the striped side that is 1” wide X height of the card and horizontally adhere 2mm away from the folded edge of the card. Note that the stripes must run horizontally on the card as per pic.
  2. Cut one of the lavender 6’ x 6” sheets from the Carders Pack 3.5” X height of the card and horizontally tear off approx. a ¼”and distress. Add a torn silver layer underneath and adhere to the card so that the mat overlaps the stripes by ½” and there is a white border on the opening edge of the card.
  3. Using the 2” piece of silver frame that you put aside earlier, matt the lavender side of DC97003 underneath the frame and adhere with the opening edge of the frame against the opening edge of the card. Adhere a die-cut teal bird from the Carders Pack inside the frame and cut a silver washitape flag coming from underneath the frame where the bird is positioned.
  4. 3D the scalloped circle and greeting die-cut(which I cut smaller using a cuttlebug die or you could use a punch) and layer and embellish as per pic.

C97 A Treat for You Card

My Fair Lady Collection – CANVAS – by Trudi Harrison


For This Project You Will Need:

  • FabScraps My Fair Lady Collection paper range: C94 001, 005 & 008
  • FabScraps Sticker Sheet ST94 001
  • FabScraps Carder’s Pack MC94 001A
  • fabScraps Stencil DS 068
  • 8” x 10” Flat Canvas
  • Matte Gel
  • Texture Paste
  • White Gesso
  • Super Fine Crystal Glitter
  • Tim Holtz Distress Ink Dusty Concord, Peacock Feathers, Pickled Raspberry, Aged Mahogany, Victorian Velvet & Walnut Stain
  • Blending Tool
  • Black Pigment Ink
  • Texture Stamp
  • Punches: Small Flower & Leaf
  • Leaf Flourish & Spiral Flower Dies & Roller Machine
  • Metal Embellishments, Tulle, Bling Button, Flat Back Self Adhesive Pearls, Flowers

Instructions:

  1. Cover flat back canvas with paper C94 005. Paint over with Matte Gel and allow to dry.
  2. Place the Stencil DS 068 over the top. This creates the background for the dress/skirt.  Refer to photo for placement.  Scrape over the top with texture paste.  Whilst the paste is still wet, sprinkle with super fine crystal glitter.  Allow to dry or heat dry to quicken the process.
  3. Dab randomly with white gesso on a sponge.
  4. Add colour with distress inks and water. I worked with Dusty Concord and Pickled Raspberry to begin with.
  5. Remove the handle from an umbrella die cut from the Carder’s Pack. On the reverse side, colour with Dusty Concord and Pickled Raspberry Distress Inks and water.  When dry dab over lightly with white gesso.  Ink the edges with Victorian Velvet Distress Ink.
  6. Fussy cut the Lady and a few flowers, vines and leaf elements from the paper C94 001. Ink the edges with Victorian Velvet distress Ink.
  7. Die Cut a Spiral flower from a coordinating paper from the Carder’s Pack. Ink the edges with Dusty Concord Distress Ink. Roll the spiral to create the rose blossom.
  8. Die Cut a few leafy flourishes from C94 008 paper.
  9. Punch out a few small flowers and leaves from the C94 008 paper. Ink the edges with Dusty Concord Distress Ink.
  10. Cut up some strips of tulle and attach in place at the top of the stencilled image.
  11. Position the umbrella over the top along with the Lady. Attach in place when happy with placement.
  12. Attach a Bling Button and arrange a few of the fussy cut floral element, vines and leaves. Position and attach the spiral flower over the top.  Tuck in an umbrella sticker from ST94 001 – First attach to a lighter scrap of paper and trim around the outer edge.  Refer to photo for arrangement ideas.
  13. Add a few smaller coordinating flowers.
  14. Attach smaller punched flowers randomly over the stencilled detail. Add small adhesive flat back pearls to the centres.
  15. Tuck in a few metal elements behind the Lady. Refer to photo for placement ideas.
  16. Add more colour depth to the background until you are happy with the look. I worked with Walnut Stain, Victorian Velvet and Dusty Concord Distress Ink.  Rub these in with a blending tool.  If you do not have a blending tool, a make- up sponge will also do the job quite nicely.
  17. Add contrast colour accents with Peacock Feathers Distress Ink.
  18. You may also like to add stamped detail with texture stamps.
  19. Ink the outer edges of the canvas with Walnut Stain. Blend around the edge with Aged Mahogany and Peacock Feathers.
  20. Add hanging pearl ‘tendrils’ across the top of the canvas with self- adhesive strip flat back pearls. Attach in place, a few smaller metal embellishments.
  21. Add title/sentiment.

FabScraps_C94_Canvas_Trudi Harrison_edited-1


MY FAIR LADY COLLECTION – Gatsby inspired Tags – by Helen Hunter


For This Project You Will Need:

  • FabScraps MC94 001A Carder’s Pack
  • FabScraps ST94 001 Stickers Sheet
  • FabScraps ST94 002 Stickers Sheet
  • FabScraps Stencil DS 067
  • Neutral coloured woven ribbon
  • Upkit – 3 size Tag Punch
  • 3D Contour Paste
  • Feathers, Small Bling, Small Pearls, Lace
  • Tim Holtz Distress Inks various colours
  • Stazon Jet Black
  • VesaMagic Jumbo Java
  • Random Script Rubber Stamp


Instructions:

  1. Cut 3 Tags 63mm wide x 150mm height, punch top edge with Upkit 3 size Tag Punch
  2. Ink all tag edges with VersaMagic Jumbo Java
  3. Cut Sticker in half from top to bottom from frames on ST94 001
  4. Apply the half pieces to the edge of the tags in random places, creating the first layer
  5. Stamp Script Rubber Stamp randomly over tag with Jet Black Stazon Ink, to create the second layer
  6. Using Tim Holtz Distress Ink, ink part of the shapes from Stencil DS 067 to create the third layer
  7. On one tag use the die-cut shape of the gramophone from MC94 001A, blend the distress ink around the gramophone shape onto the tag
  8. Using 3D Contour paste and Stencil DS 067 (unwashed) apply a thin layer of contour paste over the three layers you have already created, it automatically pics up the left over colour from the inking and creates a fourth layer on the tag
  9. Allow all to thoroughly dry
  10. Using 3 stickers from ST94 002 Stickers Sheet, make 3 embellishments by sticking them onto off cut pieces of paper and fussy cutting the shape out. Apply to the tags with foam tape to create dimension on the tag
  11. Decorate each tag with feathers, lace, small bling, pearls
  12. Loop the woven ribbon through the hole at the top of the tags and cut edges neatly. Three different ways to loop the ribbon shown on the three tag samples.
  13. All Done!


C94 My Fair Lady Collection – Layout – by Valerie Thorpe


Natural Beauty

For this project – you will need:

  • Fabscraps My Fair Lady Collection papers : C94 004 both sides of the paper or,
  • Fabscraps Carder Kit : MC94 001A – I used four of the peach 6 x 6 papers
  • Fabscraps Sticker sheet : ST94 002
  • Fabscraps Chipboard title : DC94 006 Natural Beauty
  • Fabscraps Chipboard : DC94 005 Keys
  • 2 Sheets Peach cardstock
  • 2 sheets Green cardstock
  • White doily
  • Gold washi tape
  • White lace washi tape
  • Stencil – flower stencil
  • Perfect pearls – gold
  • Distress paint in Peach, Rust and gold
  • Embossing powder in Peach, Rust and gold
  • Distress stains in Peach and Rust.
  • Printed words, Jute, Peach brads, and brown ink.
  • Chevron Stamp

Instructions:

  • Tape the two peach cardstock together at the back with some painters tape to hold it together.
  • Cut two strips of 10cms from sheet 004 – you want to use the stripy side.
  • Take another sheet of 004 and cut into two pieces of 15cms each. I used four sheets – 6 x 6 -from the carders kit.
  • Place the sheets on the peach cardstock using the stripe at the top on the left hand page and the floral underneath. Switch around for the right hand page. Cover the seams with gold washi tape and then add a strip of the lace tape above on the left side and under on the right side.
  • Use the flower stencil with perfect pearls above the strips on both the left and the right. They will just pop up above the paper. Leave it to dry.
  • Take the chipboard title and the key and paint with the three colours of distress paint. Don’t be careful or precise. You just want to add colour. Dry it with a heat tool or allow to dry naturally.
  • Add specks of the three different embossing powders and heat set with a heat tool. Should also just be random – for
  • Put some distress stain in puddles on a craft mat and swipe the doily through until you are happy with the colour. Leve to dry.
  • Mat photos onto green cardstock. Once the doily is dry cut in half and add to both sides of the layout so it peeps out from above and under the photos. Place photos on layout.
  • Cut a piece of the striped paper and mat onto green cardstock. Round the edges and place on your layout for journaling.
  • You will need to punch out five sets of four circles to make your flowers. Stack the circles and secure with a brad. Spritz the flower with water and crunch up. Once dry flatten out a little bit. Also cut a little banner out of the left over papers and attach to the top right hand side of the layout. Punch out three butterflies from the green cardstock. Add two of the flowers on top of the banner. Add the title on top of the doily above the photo and embellish with one of the butterflies.
  • Fussy cut a couple of the flowers from the scraps and put onto the journaling card. Add one of the flowers and a       butterfly to this cluster too. Tuck the key to the side of the card. Add two of the flowers, some jute to the key and           mat         the saying onto white cardstock and fussy cut. Tuck this under the flowers. Embellish with a butterfly.
  • Stamp the chevron onto the layout using the brown ink that you used to edge the papers. Then finally I added some drops of perfect pearl to each of the butterflies, and added three printed words to my layout.

ALL DONE!

IMG_6460

IMG_6461

IMG_6462